Get the light wrong on a wall art piece and even a striking original painting reads flat, washed out or glary from across the room — get it right and a $500 print looks gallery-grade. This guide covers exactly how to light wall art at home, room by room, fixture by fixture, for 2026.
- Warm white LED at 2700K-3000K with a CRI of 90+ is the standard for how to light wall art without shifting its true colour.
- Mount picture lights 30-45cm above the frame and angle the beam at roughly 30 degrees to kill glare.
- Original paintings with texture, like oil on linen or acrylic impasto, need angled cross-lighting, not flat overhead light, or the brushwork disappears.
- Glossy canvas and glass-framed prints need a wider beam spread than matte paper to avoid a single hot spot.
- Ambient room light plus one dedicated art light beats a single bright downlight every time.
Why this matters
Most people light a room for function first and hang the art after, which is backwards if the piece is the focal point. A curated wall art collection chosen for its colour and texture loses most of that value under the wrong bulb.
Cheap cool-white downlights (5000K+) drain warmth from reds, ochres and skin tones — exactly the palette in a lot of landscape and abstract painting. Direct overhead light also flattens texture, so an oil-on-linen original with visible brush strokes looks like a flat print instead of a painting with depth.
Get the temperature, angle and distance right once and you never think about it again. This is a 20-minute fix, not a renovation.
What you'll need
- A tape measure
- One dedicated art light per feature piece — picture light, track spotlight, or adjustable recessed downlight
- LED bulbs rated 2700K-3000K with CRI 90 or higher
- A dimmer switch or dimmable smart bulb (optional but worth it)
- The wall art itself already hung at the correct height — if you haven't sorted sizing yet, check how to choose the right size wall art for your wall before you commit to a fixture position
The steps
1. Map your natural light first
Walk the room at the time of day you'll actually look at the art — evening for a living room, morning for a home office. Note where direct sun hits the piece, because UV exposure fades pigment on original paintings and unprotected prints faster than any artificial light ever will.
Rooms with strong afternoon sun need the art light to compensate after dark, not compete with the sun during the day. Common mistake: hanging a piece directly opposite a west-facing window, which causes glare all afternoon and fading within a year or two.
2. Choose the right colour temperature
Warm white (2700K-3000K) with a CRI of 90 or above is the standard for how to light wall art accurately in 2026. Anything above 4000K skews blue and drains warmth from reds and golds — the exact palette in pieces like a sunset landscape.
Check the bulb packaging for both numbers, not just wattage. Common mistake: buying a bulb based on brightness (lumens) alone and ending up with a cold, clinical wash across a warm-toned canvas.
3. Pick the right fixture type
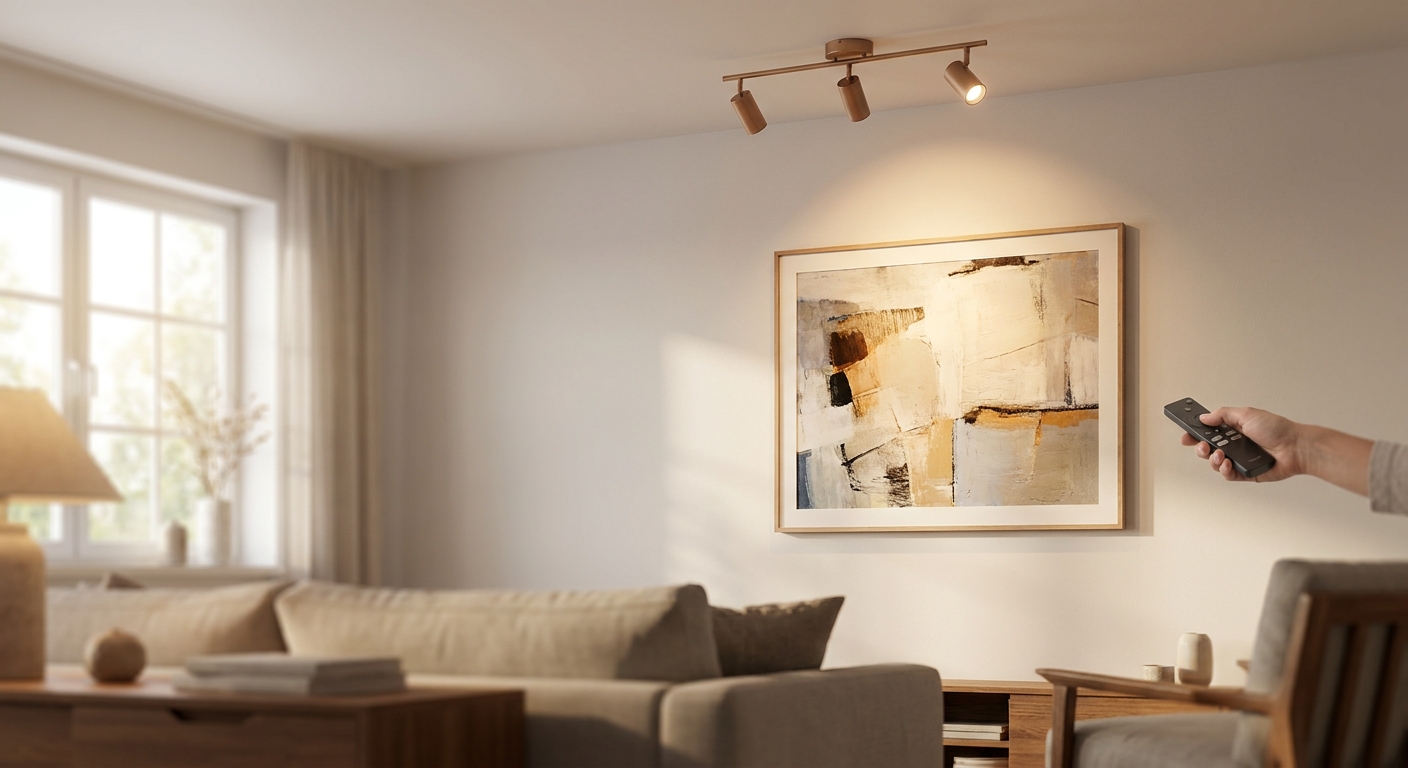
Picture lights mount directly above the frame and throw an even wash down the surface — best for single statement pieces. Track lighting and adjustable recessed downlights suit gallery walls where you need to aim several beams independently.
Wall-mounted spotlights work for large original paintings where you want the beam sourced from a distance rather than right on top of the canvas. Common mistake: using one central ceiling downlight for a whole gallery wall, which lights the middle piece and leaves the edges in shadow.
4. Set the beam angle and distance
Aim for roughly a 30-degree angle from the light source to the centre of the artwork — steep enough to avoid glare bouncing straight back at the viewer, shallow enough to still light the full surface evenly. Picture lights typically sit 30-45cm above the top of the frame.
For track spotlights mounted on the ceiling, the distance from wall to fixture usually needs to be 60-90cm depending on ceiling height and beam spread. Common mistake: mounting the light directly perpendicular to the canvas, which creates a bright hot spot in the centre and dark corners.
5. Match beam spread to the surface finish
Glossy canvas prints and glass-framed prints reflect light directly back, so they need a wider, more diffuse beam than matte paper or unframed canvas. A narrow spotlight on a glossy surface creates one blinding hot spot instead of an even wash.
Original paintings with heavy texture — think oil on linen or acrylic with visible palette-knife marks — actually benefit from a slightly narrower, angled beam because the raking light catches the texture and adds dimension. Common mistake: using the same fixture and angle for a glossy print and a textured original; they need different treatment.
6. Layer with ambient light
A single art light in an otherwise dark room creates a spotlight effect that looks more like a museum exhibit than a home. Keep general room lighting on at a lower level so the art light reads as an accent, not the only source in the room.
Dimmers matter here — the same fixture set at 100% for daytime cleaning and 40% for evening ambience gives you two completely different moods from one setup. Common mistake: skipping the dimmer and living with one fixed brightness that's either too harsh at night or too dim during the day.
7. Test at night and adjust
Daylight hides lighting mistakes. Turn off natural light and check the piece after dark, standing where you'd actually sit or stand to view it, not directly in front of the wall.
Move the fixture a few centimetres at a time rather than replacing it outright — most glare and hot-spot problems are a distance or angle issue, not a wrong bulb. Common mistake: judging the setup during the day and never rechecking it once the sun goes down.
Troubleshooting
- Glare bouncing off the surface: move the light further from perpendicular — widen the angle toward 30-40 degrees rather than lighting it head-on.
- Colours look washed out or blue-tinted: swap the bulb for 2700K-3000K warm white with CRI 90+; this is almost always a bulb temperature issue, not a placement one.
- A shadow line from the frame lip: raise the light slightly or increase the distance from the wall so the beam clears the frame edge before hitting the canvas.
- Uneven light across a gallery wall: switch from one central downlight to individual track heads or picture lights per piece, aimed independently.
- Fixture feels warm to the touch near an original painting: switch to LED — halogen runs hot enough to accelerate fading and cracking on oil paint over years of use.
- Daytime glare from a nearby window competing with the art light: add a sheer curtain or blind to diffuse direct sun rather than fighting it with more artificial light.
Texture is where lighting choice shows up fastest. An original like A Quiet Place, painted in acrylic on linen at 160cm x 160cm, has enough surface movement that a flat overhead downlight kills the depth, while an angled picture light brings the brush strokes forward.


Tools and resources
- Dimmable LED picture lights or track heads rated 2700K-3000K, CRI 90+
- A tape measure for setting the 30-45cm mount distance
- A smart bulb or dimmer switch for adjusting brightness between day and night
- How to hang heavy canvas prints safely for large-format pieces before you start positioning a fixture
What to do next
Once the lighting is sorted on one piece, the same principles scale to a full feature wall. If you're planning a larger statement piece as the room's anchor, best statement wall art for a feature wall covers sizing and placement that pairs directly with the lighting setup above.
FAQ
What's the best light temperature for wall art?
Warm white LED between 2700K and 3000K with a CRI of 90 or higher is the standard for 2026. Anything cooler than 3500K shifts reds and golds toward blue and mutes warm-toned paintings.
How far should a light be from a painting?
Picture lights typically sit 30-45cm above the top of the frame, angled at roughly 30 degrees toward the centre. Track spotlights mounted on the ceiling usually need 60-90cm of distance depending on beam spread.
Is LED or halogen better for lighting art?
LED wins for original paintings and canvas because it runs cooler and won't accelerate fading the way halogen heat can over years of daily use. LED also comes in the 2700K-3000K, CRI 90+ range needed for accurate colour.
Should a canvas print be lit differently to a framed print?
Yes. Glossy canvas and glass-framed prints need a wider, more diffuse beam to avoid a single glare hot spot, while matte unframed canvas tolerates a narrower, more direct light.
Can natural light damage original paintings?
Direct sun fades pigment on oil and acrylic paintings within a year or two of consistent exposure. Position original artwork away from direct sunlight and rely on artificial lighting after dark instead.
What's the best angle for a picture light?
Roughly 30 degrees from the light source to the centre of the artwork gives even coverage without glare bouncing back at the viewer. A steeper, near-perpendicular angle creates a bright hot spot in the middle of the piece.
Do original paintings need different lighting to prints?
Textured originals, like oil on linen or acrylic with palette-knife marks, benefit from an angled beam that catches the raking light and shows depth. Flat prints don't have that texture, so a straight-on wash works fine.
Does a gallery wall need one light or several?
Several. One central downlight lights the middle piece and leaves the edges dim, so individual track heads or picture lights aimed at each artwork give even coverage across the whole wall.
One last thing
The detail most people skip: textured original paintings actually look better under a slightly narrower, more angled beam than flat prints do, because the raking light catches every brushstroke instead of washing it flat. Next time you're staging a piece like Sunset Between Blue Pines, tilt the fixture a few degrees more than feels natural and watch the surface come alive.