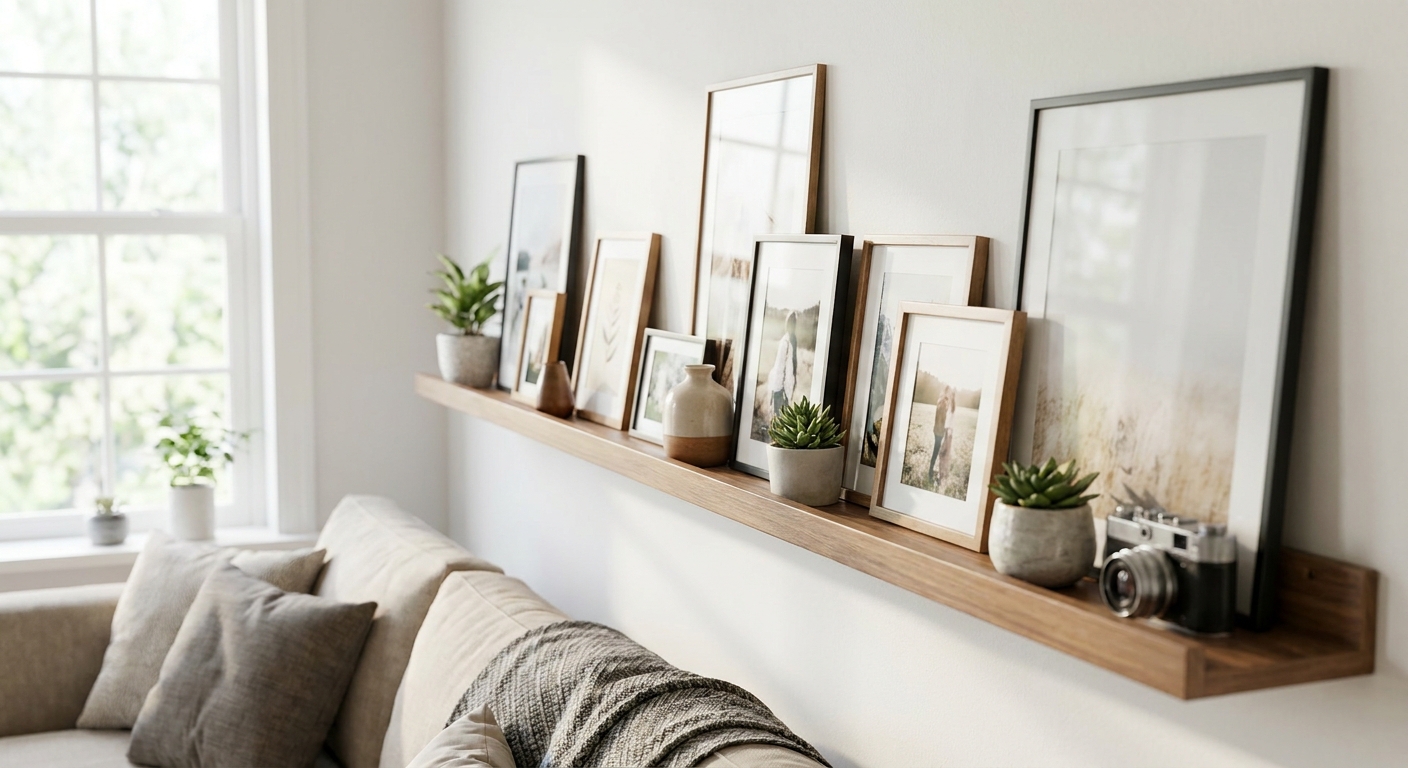
Picture ledge shelves let you build a layered art display without a single extra nail hole, and getting the layout right comes down to sequencing, not talent.
- Learning how to style a picture ledge starts with one anchor piece, not a full symmetrical row.
- A 90cm floating ledge comfortably holds 3-4 overlapping frames in 2026-standard sizing.
- Lean art forward at a 5-8 degree angle against the wall so pieces don't slide off the ledge.
- Mix a framed print, an unframed canvas and one small original painting for genuine depth.
- Skip glass-front frames on ledges near doorways — foot traffic vibration knocks them forward.
Why this matters
A picture ledge display solves the two biggest complaints renters and first-time art buyers have in 2026: commitment and cost of change. Hang art conventionally and every rearrange means new holes, new patching, new touch-up paint. Lean it on a ledge and you can swap pieces in under a minute, which matters if you're the type who rotates seasonal art or buys one new piece every few months.
The other reason ledges work: they read as intentional and collected rather than matched-set. A row of frames hung dead-level looks like a hotel corridor. A ledge with overlapping sizes, a leaning canvas and one small original looks like it was built up over time — even if you assembled it in an afternoon.
What you'll need
- One or two floating picture ledges, at least 10cm deep if you're leaning anything larger than A4
- 3-5 pieces of wall art in mixed sizes and formats — at least one framed print, one canvas or unframed piece, and one small accent piece
- A stud finder or wall anchors rated for the ledge's weight, particularly on plasterboard
- A spirit level for the ledge itself (the art can sit slightly imperfect once it's leaning)
- Masking tape to mark ledge position before drilling
- Command strips or museum putty as backup security for the top edge of each frame
If you're building the display around new purchases rather than existing art, work out your mix before you buy. Ledges reward variety — a gallery wall layout mindset applies here even though nothing gets hung flush to the wall.
The steps
1. Choose your ledge length and mounting height
Get the shelf itself right before you touch any art. A 90cm ledge is the workhorse length for a picture ledge display above a console table, sofa or bed — long enough for 3-4 pieces without crowding. Mount the top of the ledge roughly 12-15cm above the furniture it sits over, or at eye level (around 145-155cm from the floor) if it's a standalone feature wall.
Common mistake: mounting too high because it looks better empty. Test the height with one frame leaning against the wall before you commit to drill holes — an empty ledge always reads taller than a styled one.
2. Pick your anchor piece first
Every strong ledge display has one piece that's clearly the largest or most visually dense — this is your anchor, and everything else gets arranged around it. For a 90cm ledge, an anchor around 40-50cm wide works; anything bigger overwhelms the shelf's depth.
This is where sizing calls get tricky, and getting it wrong is the single most common reason a ledge display looks off. Run the numbers against your actual wall and ledge dimensions using a guide on how to choose the right size wall art for your wall before you buy the anchor piece.
3. Layer in a mid-size piece behind and beside it
Once the anchor is placed roughly a third of the way in from one end, lean a mid-size piece (25-35cm) partially behind it, offset by 5-8cm. This overlap is what creates depth — a row of frames standing shoulder to shoulder with no overlap looks like a shelf display at a framing shop, not a curated wall.
Framed prints work best for this layer because the frame edge reads clearly even when 60-70% of the piece is hidden. A run of framed prints for gallery walls gives you consistent frame widths to work with, which keeps the overlap looking deliberate rather than mismatched.
4. Add a small accent piece or object
Leave 15-20cm of open ledge space and place one small piece — 20cm or under — either standing alone or leaning against a small stack of books or a vase. This is the breathing-room move; without it, the ledge looks packed edge to edge and the eye has nowhere to rest.
Expected outcome after this step: you should be able to identify the anchor piece in under two seconds of looking at the shelf. If everything competes equally for attention, pull one piece and simplify.
5. Angle every piece the same amount
Lean all pieces back against the wall at roughly the same angle — usually 5-8 degrees is enough to feel intentional without looking like they're about to fall. Inconsistent leaning angles across the display is the fastest way to make a styled ledge look accidental rather than curated.
Check stability by lightly tapping the ledge edge. If anything shifts more than a centimetre, it's leaning too flat or the frame's bottom edge is too narrow for the ledge depth.
6. Secure the top corners
Even a well-angled frame can walk forward over weeks of door slams and foot traffic. Press a small piece of museum putty or a Command strip behind the top corner of each frame where it meets the wall — this holds the lean without any visible hardware from the front.
Common mistake: skipping this step on lightweight unframed prints because they seem too light to move. Paper curls with humidity changes across an Australian summer, and a curling edge pushes the whole piece forward off the ledge.
7. Step back and reset the gaps
Stand 2-3 metres back and check the negative space between pieces. Gaps should feel similar without being identical — exact spacing between every piece reads as measured rather than collected, which undercuts the whole point of a ledge display.
Minor adjustments here are normal. This is the step most people skip because they're tired of moving frames, and it's the step that separates a good ledge from a great one.


Troubleshooting
Frames keep sliding forward. The ledge's front lip is too shallow or the frame's bottom edge is too narrow to grip. Add a strip of museum putty under the base or swap to a wider-edged frame.
Display looks flat, no depth. You're missing overlap. Pull two pieces closer together with a 5-8cm overlap rather than lining every frame up edge to edge.
Ledge feels overcrowded. Remove one piece entirely rather than shrinking spacing further — most overcrowded ledges have one too many pieces, not too little gap.
Can't drill into a rental wall. Adhesive-mounted ledges rated for lightweight loads exist, but check weight limits carefully before leaning anything heavier than an A3 print. A guide on hanging wall art without damaging rental walls covers anchor-free options that work with ledges too.
One piece dominates the whole shelf. Your anchor is too large relative to the ledge. Swap it for something 10-15cm narrower or move it to a second, longer ledge.
Colours clash across the pieces. Pull one unifying colour across at least two of the three-to-five pieces — a common frame tone or a repeated hue in the artwork itself ties a mixed display together without matching everything exactly.
Tools and resources
- Stud finder and a rated wall anchor kit for the ledge itself
- Spirit level for mounting, not for the art
- Museum putty or Command strips for securing leaning pieces
- A tape measure to confirm the 10cm minimum depth against your largest planned frame
- Reference on best framed wall art prints in Australia if you're sourcing new framed pieces to layer in
What to do next
Once the ledge display is set, most people find the rest of the room now needs one more anchor piece elsewhere — usually above a sofa or bed. If that's your next move, work through sizing the same way you did here before committing to a purchase.
FAQ
How do you style a picture ledge without it looking cluttered?
Limit a 90cm ledge to 3-5 pieces with one clear anchor, overlap frames by 5-8cm for depth, and leave at least 15cm of open space near one end. More than five pieces on a standard ledge almost always reads as cluttered.
What size ledge do I need for framed art?
A ledge needs to be at least 10cm deep to safely lean anything A3-sized or larger. Anything shallower works fine for postcards, small prints and photos under 20cm.
Do I need to hang or can I just lean everything?
Leaning is the whole point of a picture ledge display, but the top corner of each frame should still be secured with museum putty or a Command strip so it doesn't shift forward over time.
How many picture ledges should one wall have?
One 90cm ledge suits most feature walls. Larger walls or staircases sometimes take two stacked ledges spaced 40-50cm apart, but two ledges on a small wall usually looks busy.
Can renters use picture ledges?
Yes, and it's one of the easiest rental-friendly styling moves in 2026 because most of the visual impact comes from leaning art, not drilling extra holes for each piece.
What art works best for a ledge display versus hanging?
Framed prints, small unframed canvases and small original paintings under 60cm wide all lean well. Oversized statement pieces over 80cm generally still need a wall hook rather than a lean.
Should ledge art match the rest of the room?
It should relate to the room's palette, not match it exactly. Repeat one colour or tone across two of the pieces and let the rest of the mix vary in style and subject.
One last thing
The detail most people miss: rotate one piece on the ledge every season instead of rebuilding the whole display. A ledge earns its keep precisely because swapping the small accent piece takes thirty seconds, and a display that never changes eventually reads as static as a hung frame.